As I’ve shared previously, our house is currently on the market. I’m working on a tour of my home to share, but first I thought I’d post about how we got our place photo-ready and welcoming for potential homebuyers. At first when I scoured the internet for useful tips, I was scared off by intimidating DIY projects and the pervasive belief that only houses with granite counter tops and high-end appliances will sell. I decided then to approach the process of getting my house market-ready with a strict budget, quick timeline, and a lot of elbow grease.
This post is first in a series about how to do an easy and affordable refresh on any space in your house. You don’t need to spend a lot (or any money). You’ll see how I’ve repurposed many items I already had, borrowed some, and spent money carefully on things for a real visual impact. I believe it’s absolutely possible to make your house your dream home without a serious renovation or the help of HGTV experts.
Ten Kitchen Projects for an Easy & Affordable Kitchen Refresh
Some of the following include Amazon affiliate links, which means that if you click on one of the product links and make a purchase, I’ll receive a percentage of that sale at no cost to you. All thoughts and opinions are my own. For a full disclosure statement see my About page.
Take a long hard look at your home as if you’ve never been there before. What jumps out as you as the main problems areas? Make a list and address them one by one. Once you’re armed with your list, start tackling the biggest projects first. Below are the kitchen projects, among many others, we completed in the course of about a month. Remember to work at your own pace. It’s hard to balance regular commitments and home projects on top of all that.
1. Cabinets
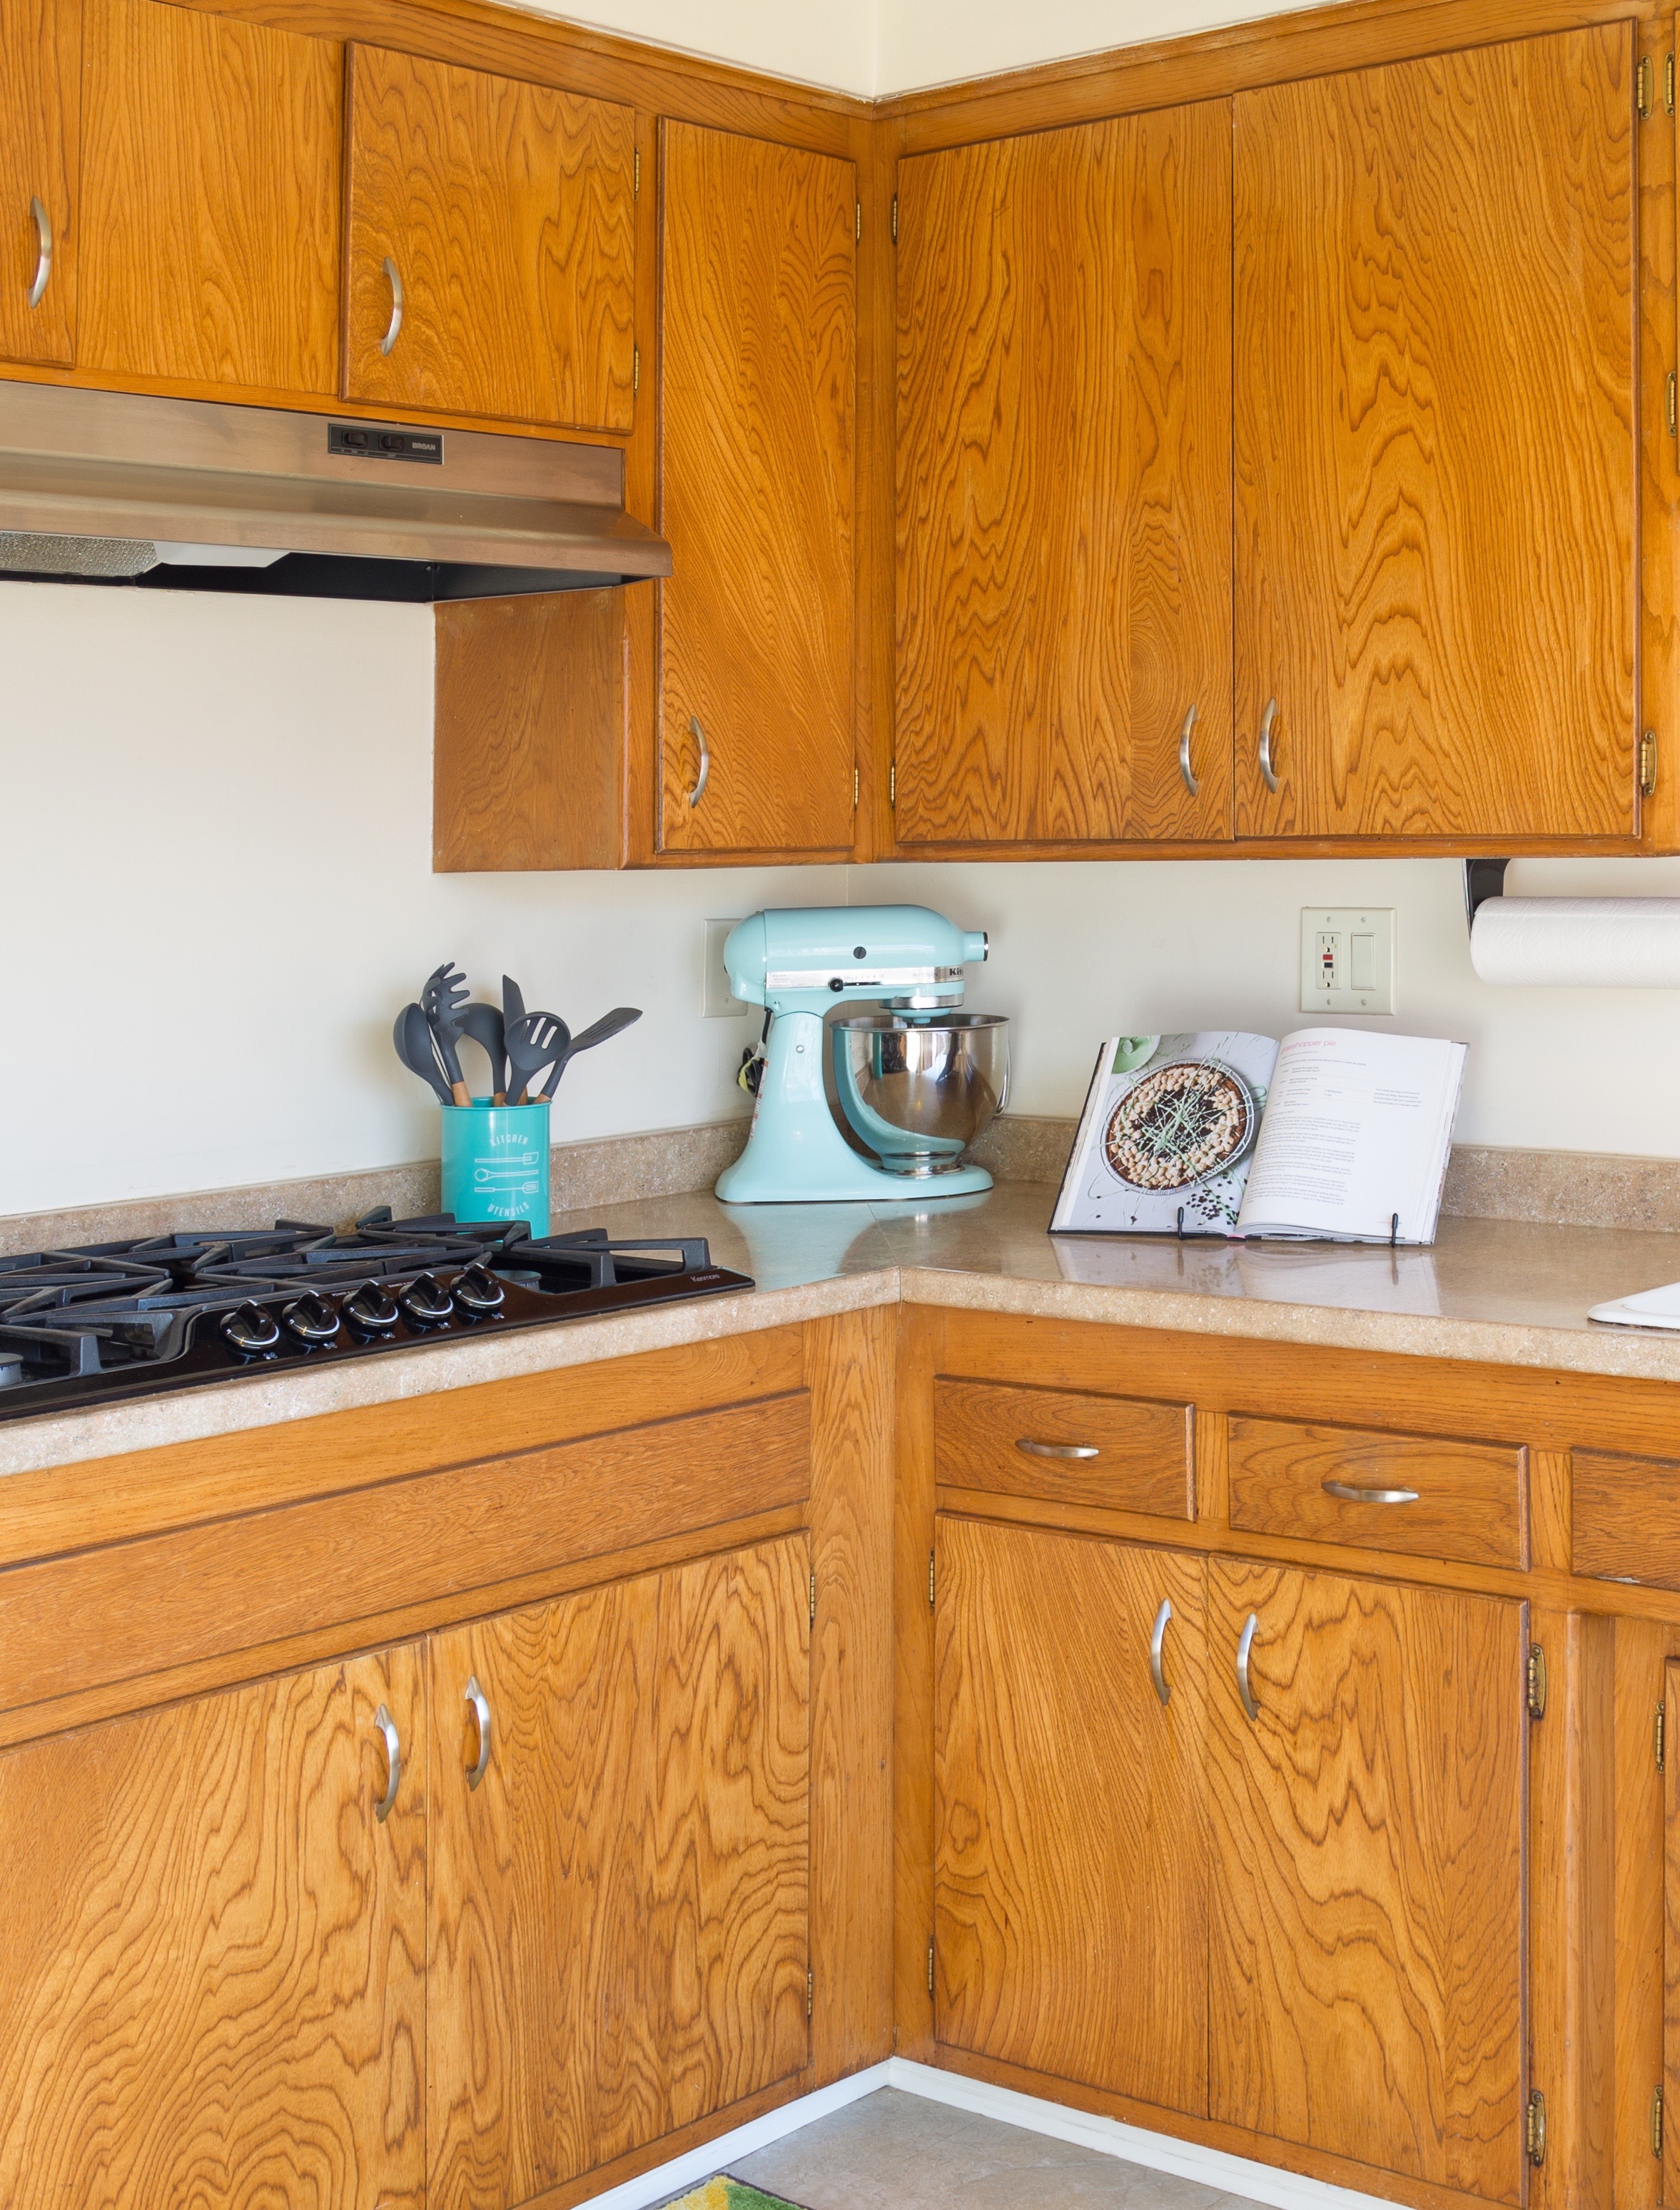
Maybe you’re like me and you dream of having perfectly painted cabinets, but maybe you’re also realistic about your DIY skills and level of time and patience. You can also hire out the work, but depending on the price of labor in your area, this could run from a couple to several thousand dollars. I had neither the time or the money, so I hopped on Pinterest for some other ideas. I found a blogger in a similar situation dealing with 1950s wood cabinets, and she recommended cleaning them and then applying Howard’s Feed N Wax. I went to work with a whole container of Clorox Wipes and a step stool. I went over each cabinet front until the wipe came back clean.
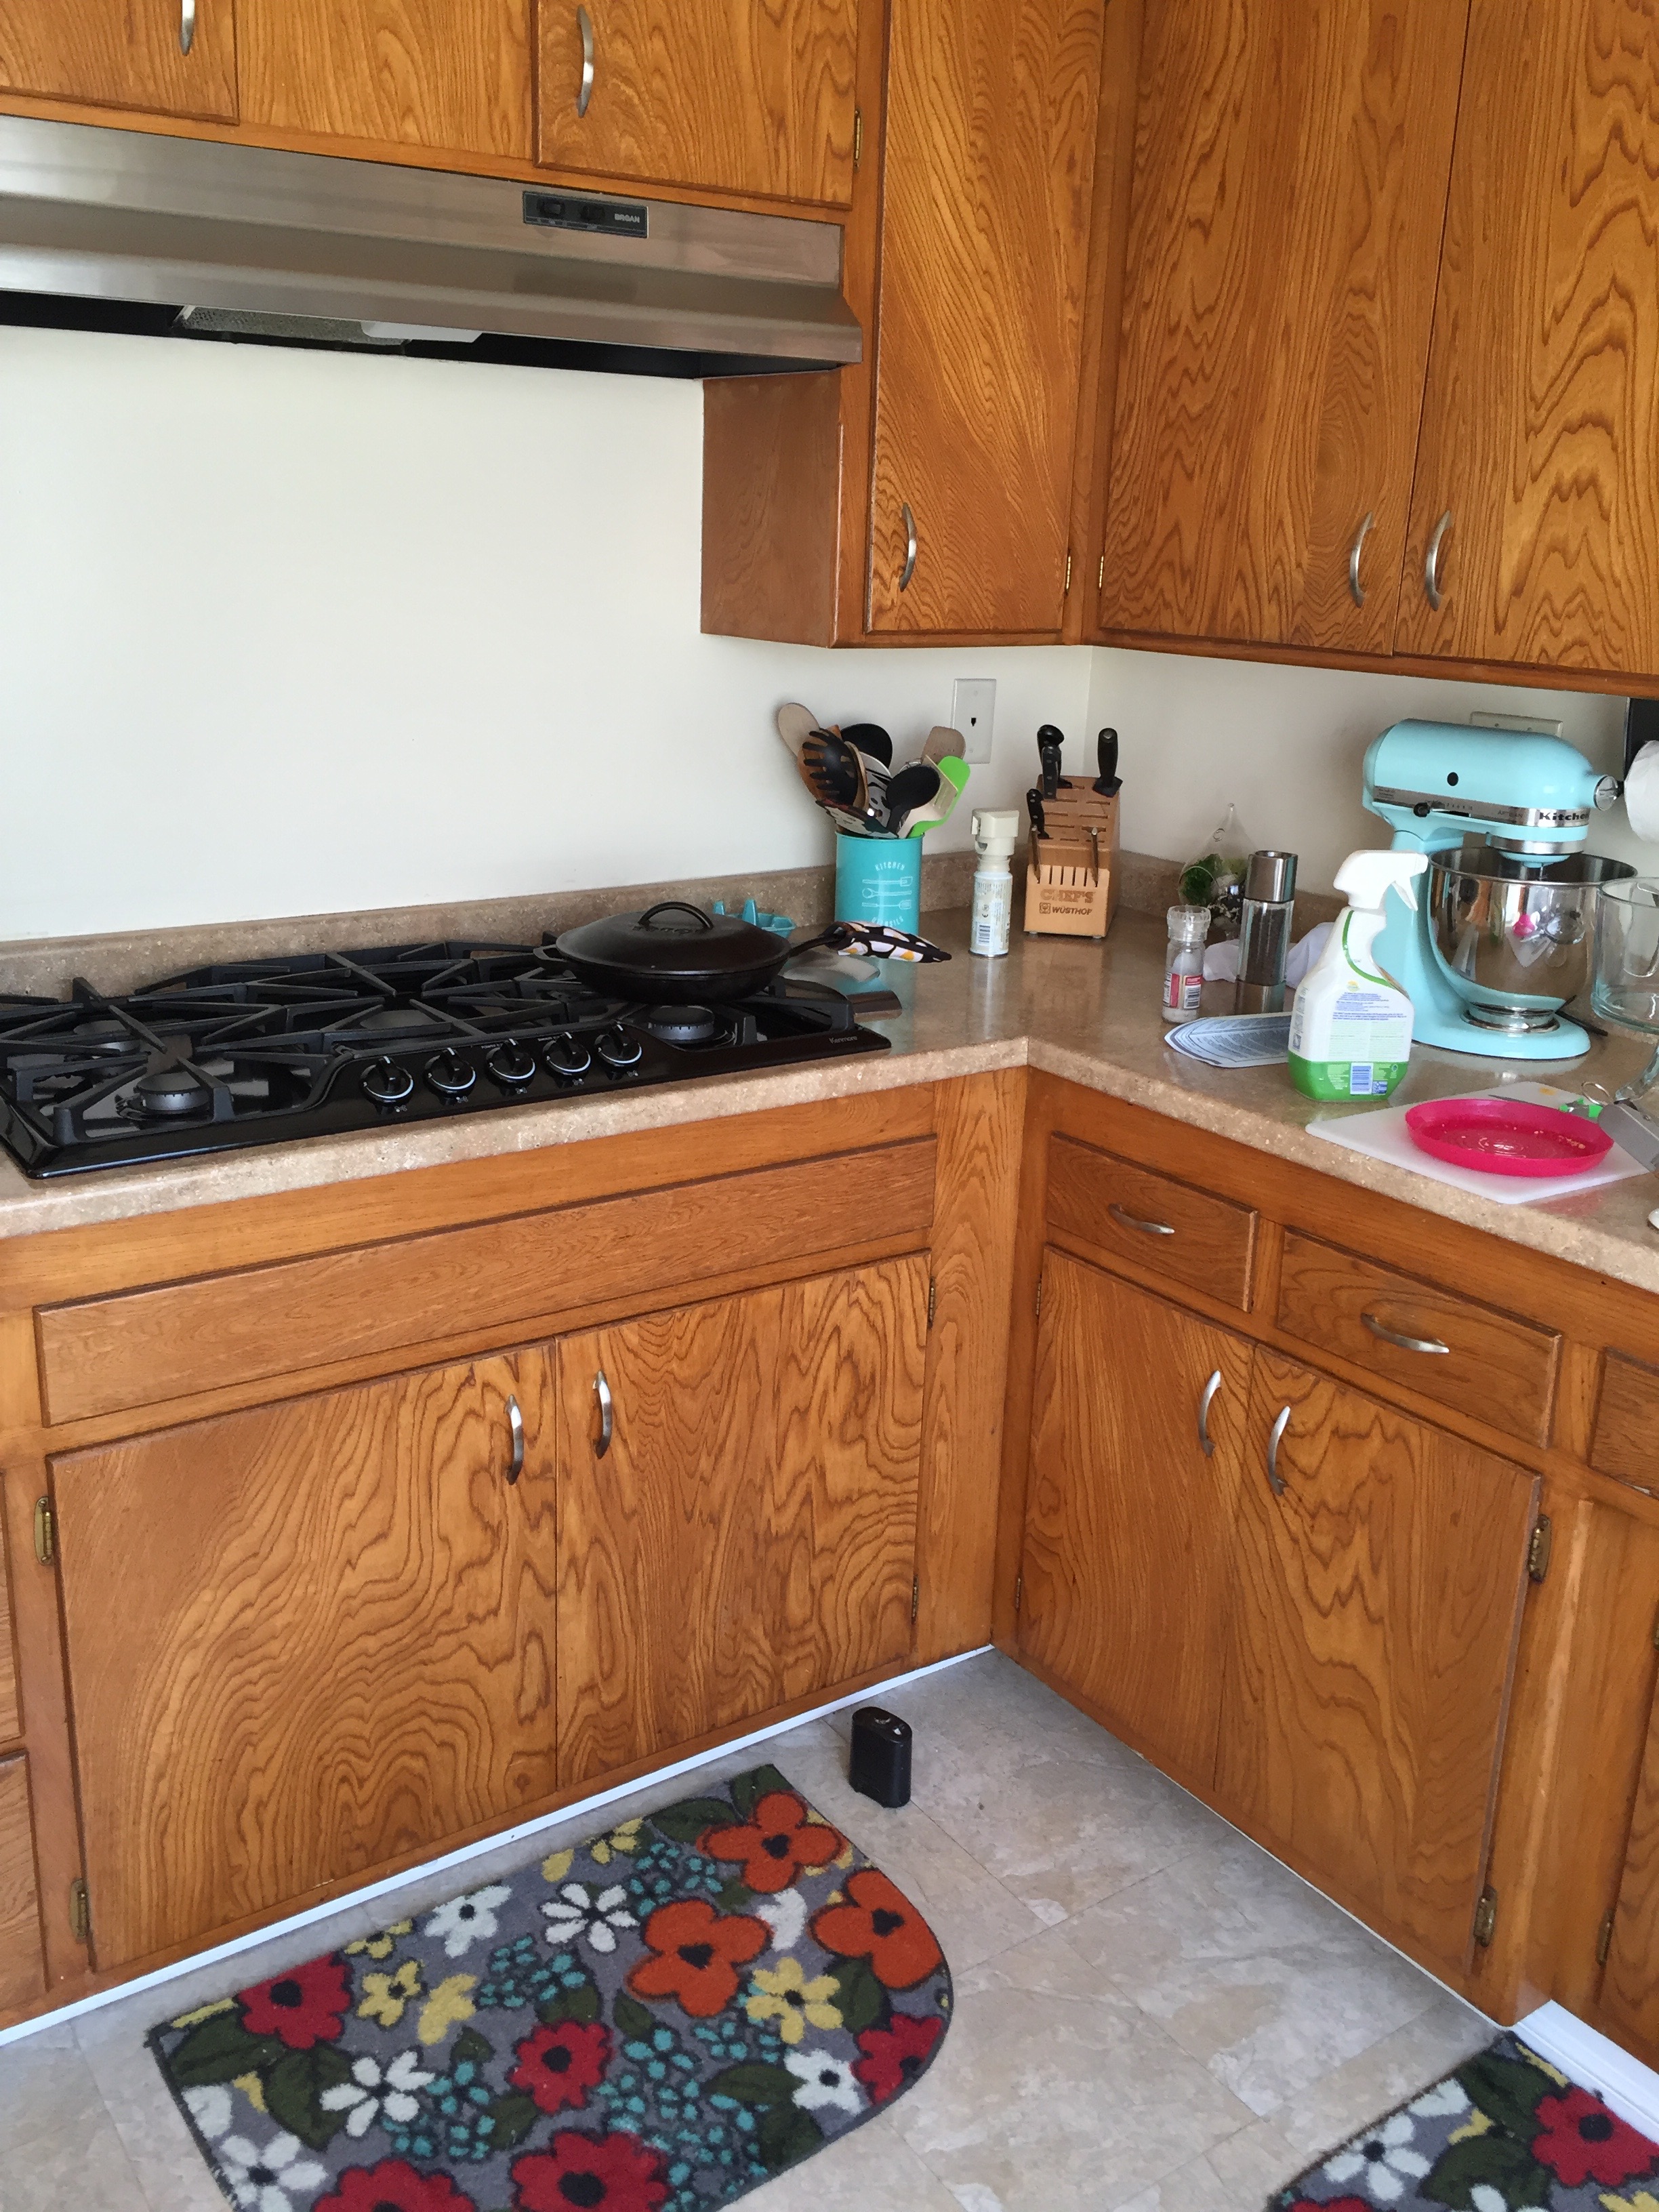
The cabinets already looked so much better with just that step, but I took it a bit further and applied Howard’s Feed N Wax liberally with a rag and then went back over everything with a clean rag. At first they felt slick to the touch, and almost had a wet look, but the initial sheen has dissipated slightly. My cabinets look shiny and refreshed, and the project cost less than $10 and just a few hours. Don’t they look amazing for having served this house faithfully for 58 years?!
If painting is a project you feel confident in taking on, then definitely go for it. There are so many great tutorials out there on how to transform your cabinets with paint.
2. Counters & Backsplash
How are your countertops and backsplash looking? Give them a good scrub and assess. If you have a laminate like me, they require zero upkeep. We’ve kept ours in great shape because we always use cutting boards for food prep and trivets for hot stuff, but if your counters are damaged and they bother you, look into affordable options to replace or repair them. You also might be surprised how you feel about your counters after they are completely clean and all clutter has been removed. As for a backsplash, we don’t have one, but here are some great DIY tutorials to paint an existing backsplash, install peel and stick subway tile, and hand-draw subway tile with a Sharpie.
3. Appliances
If you have all top of the line and matching appliances, good for you! If you don’t, that’s okay, I don’t either. For this affordable home refresh, I suggest making sure all your appliances are in working order, clean them really well, and figure out proper placement and storage of those countertop appliances.
The control panel on our oven was busted, so we did some investigating via the internet and then by phone and discovered that our oven panel was part of a recall. We got the parts for free and replaced the panel ourselves. If we had gone with our initial assumption that we would have to buy the parts, we would have been out $600 (or $800 for an all new oven).
To give our kitchen some additional counter space, I moved the microwave into the cabinet above the oven, and it actually fits perfectly. If we were staying in this house, we could easily run the cord by drilling a couple holes in the cabinet. I also tucked away the toaster and coffee grinder and we take them out only when needed. To minimize the coffee grounds spilling each time we use it, I set the grinder on top of a small tray I already had. I used this wire shelf to double the space in an awkward cabinet so I can store my Griddler and a vacuum sealer. The only two appliances that stay on the countertop are my Kitchen Aid Stand Mixer and my coffee maker, and they make me happy when I look at them.
4. Floors & Baseboards
Are your floors of the peel and stick variety like mine? Decide if the floor is in decent enough shape or replace the tiles you need to (assuming you have extras). We were able to scrape off a few stains with a razor blade, and then mopped the floors really well. My kitchen floor is far from perfect, but clean is really a huge step in the right direction. If your kitchen is small enough that you can DIY a kitchen flooring upgrade to tile or laminate, go for it. (There’s also paint.) Just remember, you can dress up drab floors with inexpensive kitchen rugs or a larger Persian area rug, as is a growing trend.
Magic Eraser does wonders for baseboards. We were able to get rid of all those scuff marks, and then used white caulk to fill in the areas that gaped. I never liked how our baseboards weren’t flush with the wall in some spots, and it was one of the painters who came to give me an estimate that told me how to properly finish them. This is a very small detail, but it costs less than twenty bucks to do and I think looks a million times better.
5. Walls
We gave the walls a thorough scrub and saw that the paint was still in great shape. The previous owner had the whole place painted before it was listed, so we’ve had the same Beach Basket paint by Frazee the whole time we’ve lived here (it’s a pale and creamy like a beach basket). I remember thinking that we’d paint at some point, but the color works really well for us so we kept it. There were some settling cracks in the doorways and around the windows, so my dad took care of those for us. If your paint is still in good shape and you like the color, just clean your walls and patch and paint any holes or cracks, ideally using the same paint leftover in the can from whenever you painted last. If your current paint job has seen better days, you can give your walls a quick paint job for a couple hundred dollars or less depending on the size of the area.
6. Declutter
You probably read about decluttering everywhere, including here, but what does that mean for the kitchen? I looked at all my cabinets and kept only the things I can’t live without. I kept my 8 favorite coffee mugs and donated or put the rest in storage. I don’t want to tell you how many I actually owned! I got rid of small kitchen tools that I don’t need. I was ruthless and purged stuff I like but never ever used: a miniature martini cocktail set, mismatched cocktail glasses, anything novelty or with logos, oversized and extra heavy ceramic mixing bowls, paper goods from parties, multiple sets of kitchen towels. Get rid of stuff that is in bad shape and replace them with something clean and new. I invested in a new utensil crock and matching set of utensils.
I used the same principles while I decluttered my fridge and food cupboards—I donated anything I could, threw out stuff that had expired, and made it a point to eat more from our pantry instead of buying anything new. Now that the pantry houses a minimal amount of staple food items, I’ve organized all our loose snacks with a large basket and store bulk foods in OXO food storage containers that I already owned.
7. Sink
If you haven’t read The Life-Changing Magic of Tidying Up or my post about it, then let me tell you a small yet crucial game-changer in the kitchen. Keep your kitchen counter and sink area free of sponges and scrub brushes; your kitchen will look instantly cleaner. We store our sponges, kitchen rags, and scrub brushes underneath the kitchen sink using wire racks and 3M Command hooks. The whole area is clear of clutter. We even installed a sink-mounted dish soap dispenser. I get my sink and faucet shiny with my new favorite cleaning product, Bar Keepers Friend Soft Cleanser. I try to wipe it down every time we use it and drip, and this really cuts down on last minute cleaning when I have a showing.
8. Lighting
It’s not hard to replace an outdated light fixture, and the choices are endless in a variety of price points. We replaced ours years ago from Home Depot. It’s nothing special, but it has a rubbed bronze look that coordinates with our dining area and hallway lights. If you need help looking for lighting for $100 and under, go here and here. Don’t forget task lighting if you need it. We made sure we had two matching bulbs in our light fixture and that they were the highest wattage possible before we put our house on the market.
9. Windows & Blinds
We hired a window washer to get our windows sparkling clean. It wasn’t cheap, but it was worth it because I’m not going to be hanging around on a ladder any time soon. Our window washer recommended a squeegee and soapy water if you want to do them yourself. I also dusted our blinds thoroughly, and plan to keep up on them with a damp cloth or a Swiffer duster to keep them in tip top shape. Natural light is your biggest friend while you’re doing a home refresh. When you let in all the natural light, you’ll notice a lot of the flaws you might otherwise miss, like the dust, stains, and spots…
10. Style
Phew. We’re finally at the fun part after all that hard work!
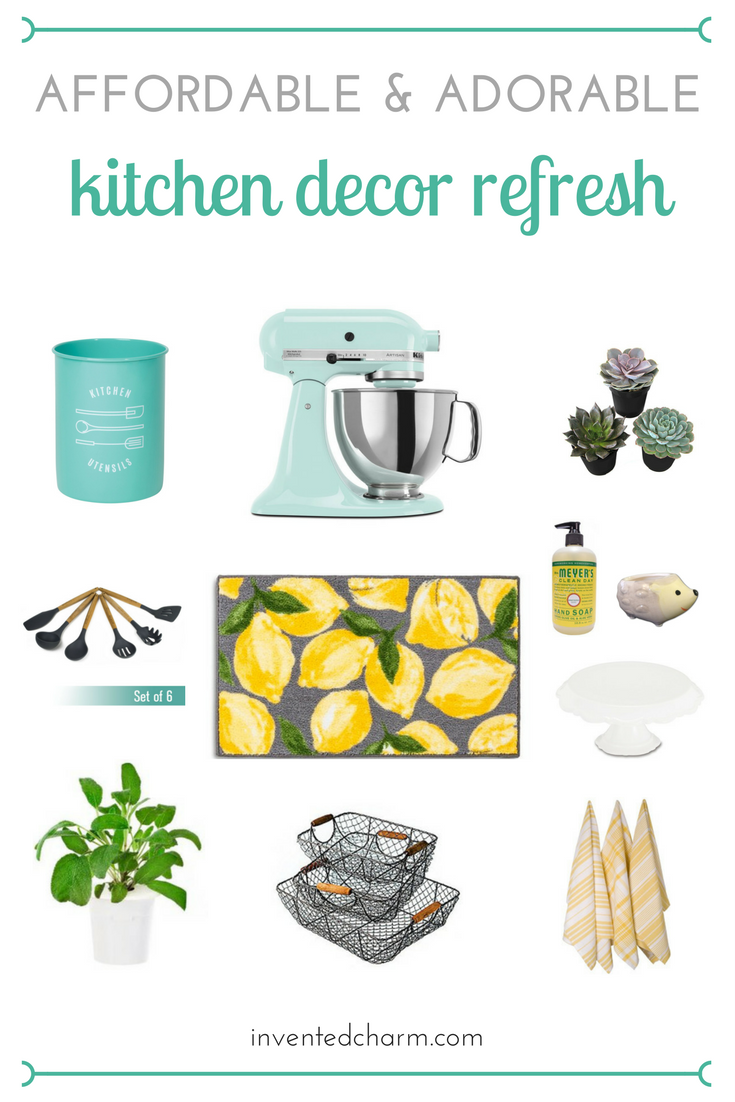
I knew I wanted to keep the color palette fresh and inviting. I felt confident I could use my Ice (light aqua) colored mixer as a feature without getting too matchy-matchy. I collected a lot of my decor items at various stores like Ross, Michael’s, and Marshalls over time, but if you don’t want to run around to a bunch of stores, Amazon is a great one stop shop and I’ve linked to similar products below.
Sources // utensil crock / mixer / succulents / utensil set / rug / hand soap / hedgehog planter / small cake stand / potted herbs / farmhouse style nesting baskets / yellow and white hand towels
My mom picked out the fun lemon rugs from Target and I went out and found a coordinating set of dish towels from Ross in yellow and white. I had the Mrs. Meyers hand soap in Honeysuckle and decided to take an idea from Pinterest and run with it by displaying it on a small cake stand. I actually bought the cake stand from Michael’s for my son’s first birthday. It looked a little bare on the stand so I ordered this adorable hedgehog planter from Amazon. I got a small succulent for it and it makes me SO happy. The new utensil crock from Amazon was a Mother’s Day gift and it ties in with the mixer and complements the yellow and gray in the rugs. I treated myself to a matching set of silicone and bamboo utensils.
I’m also a big fan of reusing and repurposing things. Collect your decor into one area and look at them with a fresh eye, or think about how you can use everyday objects like jars, vases, and bowls as vessels to display something pretty. I use different plants and fruit and flowers, depending on what is fresh and looks good at the market. Right now I have an assortment of edible gourds in a large farmhouse style basket that I got at Ross a few years ago (I bought a three in graduated sizes). During our photoshoot we had oranges instead (organic Valencia oranges were on sale!). I had a set of herbs in the medium basket, but they weren’t getting enough direct light so they went outside after about a week. Now I alternate displaying our tomatoes in a bowl or a homemade little nosegay in a Mason jar using grocery store flowers or greens from around our property.
You don’t need to buy anything new if it’s not in the budget to give your home a makeover, just choose from your own things thoughtfully—use your favorite hand towels, display some lemons in a pitcher, wash dingy yet perfectly serviceable rugs, feature your avocado green vintage mixer by clearing off other stuff from the counters, or make a new habit of opening your blinds and letting in some fresh air and sunshine daily. I think less is more in the kitchen. A kitchen should remain functional even when you’re styling it.
Later this week I’ll give you a full kitchen tour!
Related post:
This is such a great post! We’re muddling through as best we can with our kitchen until we can afford to remodel, but this has given me so many great ideas to brighten things up in the meantime!
Yay! So glad it gave you some inspo. I’d love to chat with you about your kitchen remodel. We are hoping to find a new place with a workable kitchen until we can even contemplate an update. I am not a huge fan of many of the redone homes (too much builder brown and granite). What kinds of ideas do you have for your space?